OK, I've learnt some lessons over the last couple of weeks.
Firstly, I've realised that in making the oven symmetrical I'm losing too much heat out the door. I can see the reason now that a lot of the ovens pictured on the net appear to be long a la Quebec style. I'd strongly suggest you do the same. The area of even heating I get in my oven is towards the back. So, if you want to fit more in, just extend the back further out.
Secondly, I'd make the walls much thicker. In my case the walls are about 10cm. And yet they are still too hot to touch and they are visibly losing a lot of heat (in the form of steam, convection and radiation - you can see the steam and the heat shimmers). Why lose heat when I could have it better insulated. So make a really thick insulating layer using clay, pumice, vermiculite, straw, whatever.
Finally make the door big enough at the bottom to fit your pizza peel/implements. It's painful squeezing food through a narrow opening.
All that considered - it still has performed far better than expected. I'm really quite impressed at how good an oven it is, and also at how efficient it can be.
Go build one yourself!
Monday, January 30, 2006
Monday, January 23, 2006
Pizza day
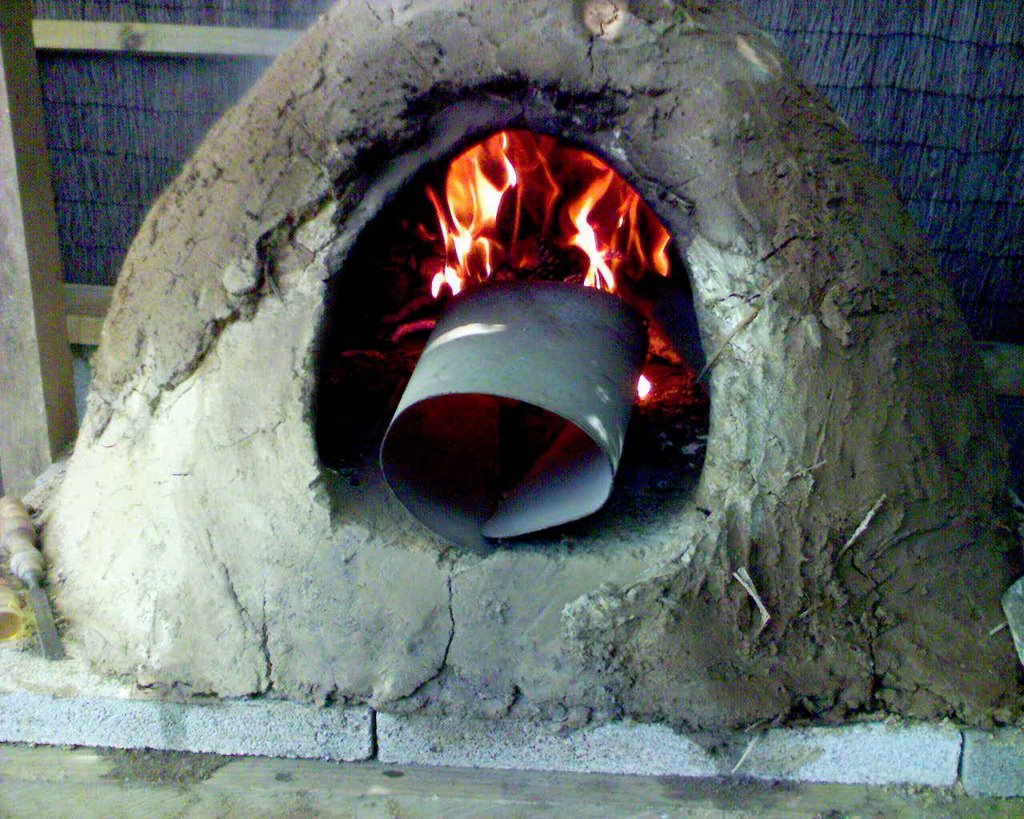
This went beyond my expectations. I started firing the oven mid-afternoon and 2 hours later the oven was hot and burning well. I then waited for the coals to die down a bit and put in the pizzas - and they were fantastic. I hadn't expected them to turn out as well or for the process to be that easy. We were all impressed. Check the picture...

I learnt a couple of lessons along the way. The initial firing was at times very smokey. As far as I could tell there were a few clear reasons for this.

I learnt a couple of lessons along the way. The initial firing was at times very smokey. As far as I could tell there were a few clear reasons for this.
- The great amount of moisture being driven off the adobe surround by the fire. Most of this I guess goes upwards and through the roof - but I'm sure a lot goes into the oven chamber and affects the burning process
- The temperature of the oven surround seems to have a big impact. Once this gets up to the point the black smoke burns off you can sustain a big fire.
- The difficulty of creating a sustaining flow of air in, and smoke out. I got around this by bending a piece of aluminium sheet into the shape of a tube. This let me provide a clear path for air straight into the burning wood. You can see this in the picture below. (Notice that we put a layer of straw/pumice cob on top of the oven to help insulate it. As far as I can see the thicker this is - the better.)

All in all it was a resounding success. I need to work on a door now. Something to close the entrance sufficiently well I can bake bread.
Wednesday, January 18, 2006
Earth building guide
Now here's a good guide to earth building. It contains information on clay, sand, cob, lime, cement amongst other materials and how to build with them in the NZ environment - sunny, windy, driving rain, yes the best of weather. Check it out at http://www.waitakere.govt.nz/AbtCit/ec/bldsus/pdf/materials/earthbuilding.pdf
Tuesday, January 17, 2006
More on the clay oven...
I've roughly speaking finished. I made a sand form using fine beach sand. Covered this with wet newspaper, then piled on the clay/sharp sand mix. I used a 2 clay : 1 sharp sand mix. The sand was a mix of what's called 'CS' and Otaki sands from Placemakers. Basically a sharp sand mix with lots of particles going from less than 1mm through to about 3mm. 
Also, check the firewood to ensure it's really dry. I thought the door must still be too small as it appeared to be smoking more than I expected so I filed some more of it away. Only then did I realise the firewood I was not completely dry.
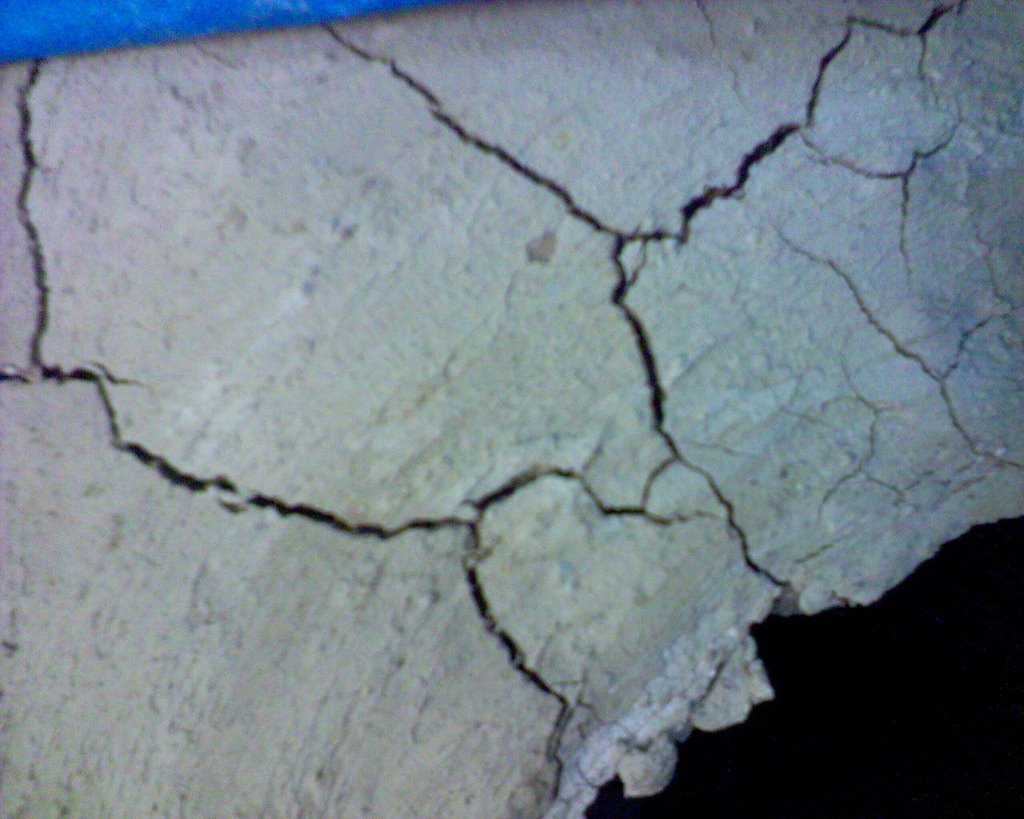
And another lesson: I tried to use a hydrated lime/clay mix to protect the external surface of the oven. My initial attempt has resulted in something far more concrete like than I was expecting. It has deeply cracked during the drying process and left me realising that lime should probably just be applied as a wash. I think I'll have to scrape this stuff off and start again. Check the picture:
Finally, many thanks to Kei Takashima for his blog and for giving me the impetus to get up and give this a go - cheers Kei

Also, check the firewood to ensure it's really dry. I thought the door must still be too small as it appeared to be smoking more than I expected so I filed some more of it away. Only then did I realise the firewood I was not completely dry.
And another lesson: I tried to use a hydrated lime/clay mix to protect the external surface of the oven. My initial attempt has resulted in something far more concrete like than I was expecting. It has deeply cracked during the drying process and left me realising that lime should probably just be applied as a wash. I think I'll have to scrape this stuff off and start again. Check the picture:
Finally, many thanks to Kei Takashima for his blog and for giving me the impetus to get up and give this a go - cheers Kei
Tuesday, January 03, 2006
Virtual PC/ Virtual Server hosting on Dell Latitude laptops
I've had a lot of trouble with this on my Dell laptop. I thought I'd share my solution to the problems I was experiencing (slow down then sudden speed up of keyboard entry and screen writes, intermittant response etc). Use a bit of software called SpeedswitchXP from http://www.diefer.de/speedswitchxp/ to stop the intel processor from switching power modes. I think these are sometimes called c-states. It works a dream. Virtual PC / Virtual Server become completely usable again. I tend to run it with the settings for maximum cpu speed. Doing this still gives me about 80 minutes on the battery - more than enough time for the trip in or out of work.
Too little sand = cracking
Lesson learnt - I made a rim for the base of the clay oven yesterday. It was mostly clay with just a little sand. Cracked severely as it dried. Check the picture.

The point here is that the clay is supposed to act as a binder for the sand. There should be a lot of sand in the adobe mix from which the oven is constructed.

The point here is that the clay is supposed to act as a binder for the sand. There should be a lot of sand in the adobe mix from which the oven is constructed.
Monday, January 02, 2006
Sony Ericson V800 and GMail POP3 access
Will it sucks - I can't get this going via POP3 and the native email client on the phone. It appears that Google's ssl certificate details aren't recognised by the V800 software. It just spits back "unknown certificate authority". The good news however, is that the google Gmail mobile site works a treat. Try http://m.gmail.com
Will it sucks - I can't get this going via POP3 and the native email client on the phone. It appears that Google's ssl certificate details aren't recognised by the V800 software. It just spits back "unknown certificate authority". The good news however, is that the google Gmail mobile site works a treat. Try http://m.gmail.com
Clay oven adventures
I've been in the process of creating an earth oven recently. I'm basing it upon the many other sites I've found on the net - try http://handyprojects.blogspot.com/ for a great description of how to build it and links to other's sites.
As a result of my dabbling with the local clay I've decided to publish what I've learnt on the net. So... a blog is born.
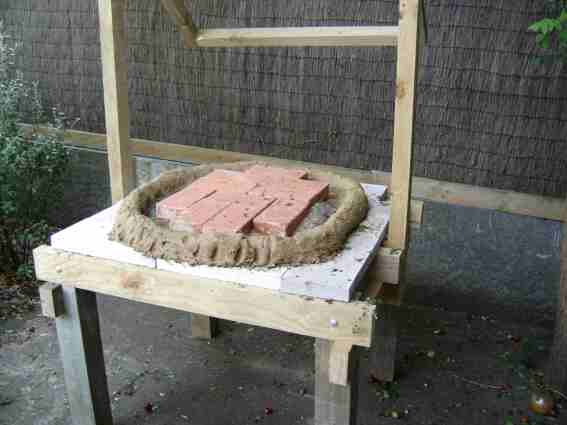
Thus far I've created the supporting structure for the oven and it's concrete and clay brick base. I used concrete wall capping to create a flat, solid base on top of H3 radiata pine 100x50mm exterior wood. My choice was dictated by the better price on the capping than the concrete pavers at the local diy store. The total area of the base was one square metre.
On top of the concrete I placed about 30mm or so of a sand/clay mix just to form a heat barrier between the clay bricks and the concrete. I figure that the capping pieces will crack if they get subjected to too much heat. On top of which I don't want to burn the H3 protected framing timber. That wouldn't be too cool. Here's a thought - why don't I put an insulating layer of pumice (like vermiculite) between the concrete capping and the heat retaining layer supporting the bricks?
Anyhow - as for the clay - here in Wellington, New Zealand, we have plenty of yellow clay. I've noticed that some of the clay I've collected acts differently to others. The best so far seems to be from the side of the narrow back road heading over the hill from Plimmerton to SH1. This seems to form a very elastic goey clay when soaked with water. I've mixed some coarse sand in and heated it in a friends chimera over drinks on New Years eve - sintered quite nicely. Even has a pinkish appearance to it.
Here's a picture of progress thus far...(the strange wood uprights are to hold a roof - I can't think of what to make of yet - not sure how high the flames will reach!)

As a result of my dabbling with the local clay I've decided to publish what I've learnt on the net. So... a blog is born.
Thus far I've created the supporting structure for the oven and it's concrete and clay brick base. I used concrete wall capping to create a flat, solid base on top of H3 radiata pine 100x50mm exterior wood. My choice was dictated by the better price on the capping than the concrete pavers at the local diy store. The total area of the base was one square metre.
On top of the concrete I placed about 30mm or so of a sand/clay mix just to form a heat barrier between the clay bricks and the concrete. I figure that the capping pieces will crack if they get subjected to too much heat. On top of which I don't want to burn the H3 protected framing timber. That wouldn't be too cool. Here's a thought - why don't I put an insulating layer of pumice (like vermiculite) between the concrete capping and the heat retaining layer supporting the bricks?
Anyhow - as for the clay - here in Wellington, New Zealand, we have plenty of yellow clay. I've noticed that some of the clay I've collected acts differently to others. The best so far seems to be from the side of the narrow back road heading over the hill from Plimmerton to SH1. This seems to form a very elastic goey clay when soaked with water. I've mixed some coarse sand in and heated it in a friends chimera over drinks on New Years eve - sintered quite nicely. Even has a pinkish appearance to it.
Here's a picture of progress thus far...(the strange wood uprights are to hold a roof - I can't think of what to make of yet - not sure how high the flames will reach!)
Subscribe to:
Posts (Atom)